OM-D E-M5 Mark II Review

DSC05354

Shot on the Sony A6000 edited in Lightroom

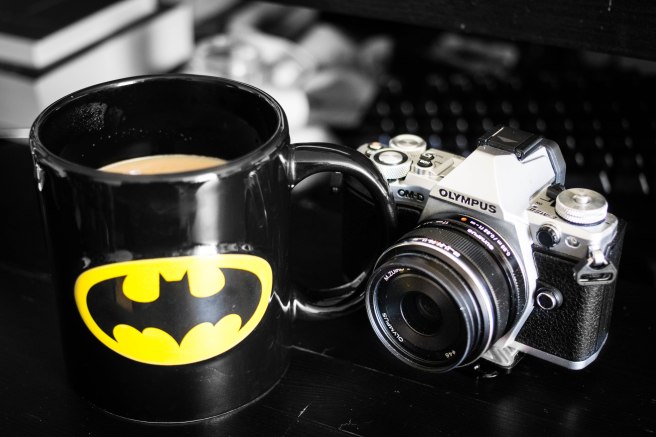
I have been using the OM-D E-M5 Mark II extensively for about 2 weeks now. I got it just before going on my trip to Cuba expecting to test it out on the trip. In short, I am very happy with this camera but it’s not perfect. So let’s start there with the cons.

Cons:

The Grip

IMG_1777

Shot on the iPhone 6s Plus

I didn’t like the grip right from the start. My hand is larger than most and it was just too uncomfortable for me. I never felt confident about holding it like I do with other cameras like my Sony A6000. Due to the size and weight of it, I found it to dig into my ring finger most the time, kind of between the side of my nail and the next closest knuckle. I was always worried about dropping it randomly so to make up for that I would hold it more often in my left hand while cupping it from under with the lens. I also found myself mistakenly clicking the button located on the front of the camera. I’m not sure what it would be assigned to on a stock camera since one of the first things I did when I got it was going in and change all the buttons to my liking. I had to key bind it to nothing for a while since I couldn’t find a use for it, it would mess with my shots when I click it by mistake or hand it over to a friend. Whenever I would hand it to a friend I can see them also click it by mistake every time. Now all this being said after about 3 days of handling and use I got used to it. My hands have naturally adapted to the weight and grip of the camera. I don’t notice it anymore. I feel I am nitpicking a bit with this flaw. To be honest I like the camera quite a bit and most of these flaws may come off as nitpicks.
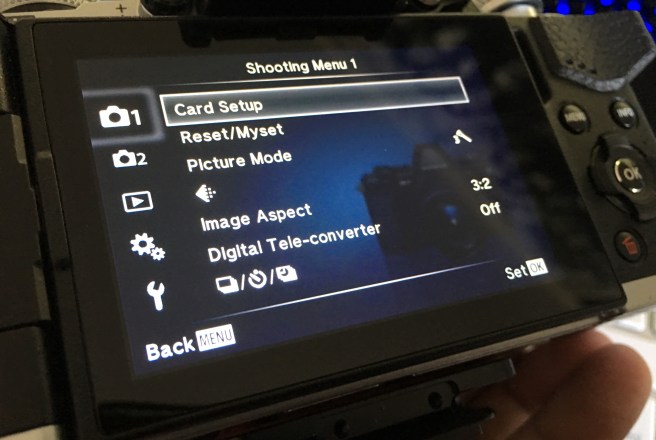
The Menus

FullSizeRender

Shot on the iPhone 6s Plus

Don’t let me get started on these menus, simply put…they suck. I don’t know who signed off on this but I have made better wireframe layouts for menus in my sleep. I feel the best way they could have went about it is increase separation. Which is how I feel most companies handle their menus. If an item can be placed into a category, simply give it its own dedicated one. What Olympus here seems to be trying to do is lower the amount of clutter but combining things here and there. It looks like there is less clutter but what ends up happening is features you would need fast access to are then hidden away within other menus. One excuse that can be given is this camera has crazy amounts of customization and in the process of that the menus can be “complicated”. I know “complicated” and this is just “messy”. I doubt this will happen but maybe Olympus will come out with a software fix for this.

Micro Four Thirds and 16MP

FullSizeRender (1)

Shot on the iPhone 6s Plus

This is one of the things I was worried about when getting this camera. This is my first M4/3 camera having only used the Panasonic GH4 before this at an event just to try out. I felt it was excellent for video but I didn’t know what to really expect for photography. With my A6000 which is an APS-C sized sensor at 1.5 crop, I would find myself with a lack of light at times. Ending up having to fiddle with the settings and make compromises to my shot to make it work. I also saw 16MP to possibly be a problem due to not allowing me to print larger or crop further. My worry about the lack of light was not that big a deal. It handled really well in dimly lit situations as good if not better than my A6000. If you don’t pixel peep at the individual grains it would give you very solid images in low light. The 16MP, on the other hand, has been a bit to work around. I feel I am more careful with my shots when taking them to make up for the megapixel size so I don’t have to crop into the shot later. It’s not a deal breaker or huge for me. The way I shoot allows me a lot of wiggle room for things like this but it would be a much bigger problem for others. If you expect to do large prints or be cropping in a post a lot I would have to say Micro Four Thirds is not for you. (Only exception being is if you are a product photographer and you plan to take advantage of “High Res Shot”. If it’s not moving it will look brilliant with a 4K shot in the end.)

Little Bits of Annoyance

OLYMPUS DIGITAL CAMERA

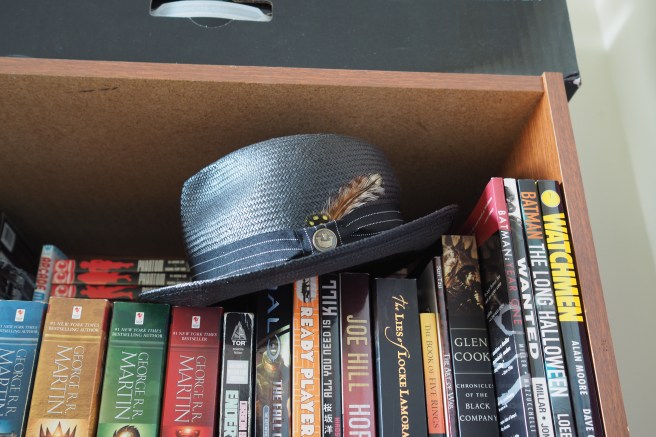
Shot on the OM-D E-M5 Mark II with the 17mm f1.8 lightly edited in Lightroom

I won’t state all my little annoyances here but there is one that stands out to me and I’m going to talk about here at the end of the Cons mainly because it is maybe the smallest problem the camera has but it is my biggest personal annoyance. Now I do understand that this con might mean nothing to you but coming from a design and media background it makes me wonder if they even bothered testing the camera out properly before release it. Now my little problem with this camera is Focus Peaking turning off when I switch to manual through the lens or when using a vintage lens. Yes, you are probably asking yourself, “Do people really still manually focus in photography?”…Yes they do. Magnification and Focus Peaking work as manual focus aids to allow you to manually focus on your subject more accurately and faster. It may not be as fast as today’s autofocus but I still find it to overall more reliable. Even though I find autofocus to be getting better and better every year.

All that out of the way, Why? Why does this feature that exists as a manual focus aid get turned off automatically when switching to manual through the lens or when using vintage lenses? It works fine when I flip my AF to MF switch but it just loses it mind when any combination of this is done. My A6000 doesn’t do that. This is what makes me think no one tested this out in development enough. This would have been one of the first things I tried if I was working on this camera. It is one of the first things I tried when I got it. I may be coming off as being really pissed about this and its kind of true. I feel the Devil is in the details and it’s such a simple detail that should not have been overlooked. Now there is a workaround for this and it’s not to bad. You can set one of the Function Buttons on the camera as a Focus Peaking on/off button. So when the camera decides to turn it off on its own you just click that button to turn it on again. The button I personally use and recommend is the small round button located on the front of the camera when your ring finger or middle finger meets the grip. The same button I talked about above when we went over the grip. I like this spot a lot since its easy to get to and miss clicking it won’t change any setting that would affect the end result. It’s simply a toggle for focus peaking. If its on and you need it, great. If its off and you need it just click the button once.

Pros:

The Build

Screen Shot 2016-07-01 at 7.26.37 PM

Shot on the iPhone 6s Plus

Now, this is debatable, but after a bit of thinking this over I think this may be the best-built camera I have ever used, and I have used many different cameras from Canon, Nikon, and Sony. I’m talking about all of the A7 line and the top Canons and Nikons. I like the build of this more. Let’s just say this, If I were to drop my Sony A6000 on my foot I would be worried about my A6000 maybe breaking. If I dropped my Olympus OM-D E-M5 Mark II on my foot, call an ambulance because I most likely need medical care. The military should have a look at this camera because this is how you should build tanks. The weather sealing, the machining and the quality of parts are as good as it gets for a pro-grade camera.

High Res Shot

OLYMPUS DIGITAL CAMERA

Shot on the OM-D E-M5 Mark II with the 17mm f1.8

OLYMPUS DIGITAL CAMERA

Shot on the OM-D E-M5 Mark II with the 17mm f1.8 cropped

The OM-D E-M5 Mark II has all the features you expect from mirrorless cameras, focus peaking, magnification, HDR, swivel touchscreen, great amounts of customization, and wifi to name a few, but it also has great new features like High Res Shot. It allows you to take a 4K picture the only catch being subject cant move at all. So things like people are out of the question. Like I said above, product photographers will have a great time with this. The few times I tested it out, I was very surprised by the result. It can also maybe be used for some landscape shots such as waterfalls. Since any kind of movement will blur the image you can get some really cool 4K shallow shots with this feature. I personally have not tried this but in theory, it should work. Having written all this and then taking the pictures you see above I realized there is a lot of potential in using Hight Res Shot for macro photography. Just look at how much you can crop and how close you can get in the second picture.

In Body Stabilization

OLYMPUS DIGITAL CAMERA

Shot on the OM-D E-M5 Mark II with the Canon FD 135mm f3.5 handheld from my room, edited in Lightroom

I’m not much of a video shooter any more but the advantages that IBS brings to photography is excellent as well. I like to use vintage lenses. I own the Canon FD 35mm, 50mm, and 135mm. On the OM-D E-M5 Mark II Micro Four Thirds sensor these focal lengths are all doubled to 70mm, 100mm, and 270mm. These lenses are extremely adorable and shoot amazing images and video. The problem with them is being vintage they have no image stabilization and no autofocus. Now autofocus isn’t a problem with features like magnification and focuses peaking but image stabilization can’t be helped. When you are trying to pull focus and also shoot a stable shot there can be a lot of motion fuzz or blur in the final images. This coming from maybe slightly missing focus and the lack of stabilization. Now with the IBS in the OM-D E-M5 Mark II, there are no problems at all. Sharp clear, bokehlicious images and video all around.

Micro Four Thirds

OLYMPUS DIGITAL CAMERA

Shot on the OM-D E-M5 Mark II with the 25mm f1.8 edited on Lightroom

M4/3 might have its limitations when it comes to light and megapixels but it also has its advantages. As stated above all mm based on full frame standards are doubled. For instance, the 50mm becomes a 100mm. Same goes for a lens at say 300mm, it would be an effective 600mm on the OM-D E-M5 Mark II M4/3 body. This allows you to get a ridiculous range while still maintaining a smaller form factor. I have used full frame cameras with some long telephoto zooms and comparing the size and weight of some of those zooms to the M4/3 counterpart is laughable. The size of some of these full frame lenses really seems to be overcompensating for something.
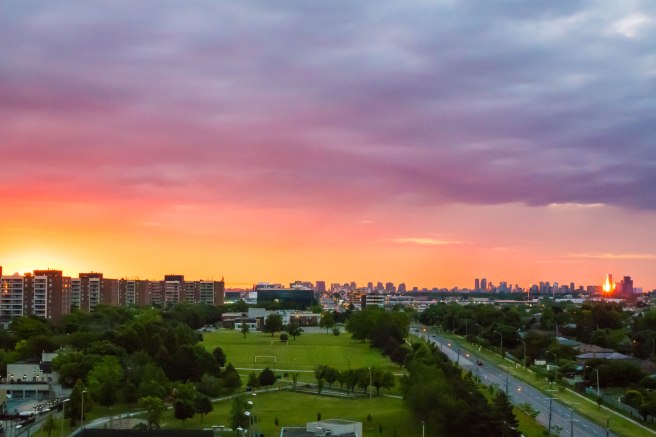
Image Quality

OLYMPUS DIGITAL CAMERA

Shot on the OM-D E-M5 Mark II with the 17mm f1.8 edited in Lightroom

I don’t know what Olympus is doing to get these images to look as good as they do. Maybe unicorn horns or angel tears but the images and colors that come out of the OM-D E-M5 Mark II are simply beautiful. I don’t shoot in jpg, I did when I started photography but I got off it quick after seeing what can be done with RAW shooting. That being said this is a camera I would actually consider shooting in jpg here and there. I probably still won’t because again, even though it gives out excellent images it will still look better after processing in RAW, but damn did I come close a few times to hitting jpg. The colors and sharpness are something special from this camera. Now part of it has a lot to do with the lens I used which in this case the Olympus 17mm 1.8. I picked this lens over the Olympus 25mm 1.8. If you want to know why keep an eye out for my next post “35mm vs 50mm”. Speaking on only on the (35mm) Olympus 17mm 1.8 I have to say its an excellent lens.

This lens teamed up with the OM-D E-M5 Mark II just might be the perfect all around team. The 35mm focal length handles everything really well. For a travel combo, I can’t think of anything better when it comes to primes. The only thing better for an all round use combo/travel combo would be some sort of zoom with the OM-D E-M5 Mark II. Personally I really can’t stand zooms for many reasons I won’t state here. If you are not sure why I don’t like zooms, you are most likely new to photography, just prefer zooms over primes, (Really?) or shoot very different subject matter. (Wildlife for instance) Whatever kind of shooter you might be there is a lens combo that will work well for you and the OM-D E-M5 Mark II. For me personally its some combination of a 35mm 50mm and 100mm prime. I’ll make a separate review on the 17mm 1.8 lenses itself or talk about it on my podcast. Either way, check the bottom of this post for links to related subjects.

Twitter – @DarksterMedia

Instagram – @DarksterMedia/@Darkster

Olympus 17mm 1.8 Lens Review

College Street Bar Hopping Review

Sneaky Dee’s

Sneaky Dee’s is a place me and my friends frequent when we go down to drink on College street. Its usually the bar we end on but we decided to start on it this time because we had a huge craving for Buzz Amber. Buzz Amber is my team’s favorite all-around beer of choice. I secretly still prefer Guinness overall but Buzz Amber is a tie or very close second. We discovered Buzz Amber at Sneaky Dee’s the first time we went drinking on College street. It was the last bar of the night that time and we just asked for something cheap and left it up to the waiter. The moment we tried it we loved it. It’s a very smooth dark beer. Very easy to drink and not notice how drunk you are getting. If any of you are ever at Sneaky Dee’s I highly recommend trying it.

DSC02166 DSC02167 DSC02170 DSC02175 DSC02183 DSC02187 DSC02193

Mullins

This was the first time we went to Mullins. My friend saw it on the way when were meeting up. We decided to give it a try after Sneaky Dee’s and we loved it. It wasn’t busy and there wasn’t any loud annoying music playing. The whole side of the place was one big window they left open. It was nice having the breeze flow into the bar. The people working there were also very nice. We asked them for what they would recommend as the drink of choice to represent the Mullen. They brought us 2 pints of Guinness. I cant complain. My favorite beer at a really nice comfy open window bar. Will visit again for sure.

DSC02214DSC02201DSC02206

Touche

I’m more of a whiskey, vodka, beer kind of a guy so things like martinis throw me off a bit. But we were trying new things and said what the hell it looks nice so let’s give it a try. We quickly noticed how “dated” the place was which made me and my friend laugh at the situation. We got our seats and went up to the bar and I asked for something that looks good in a picture but isn’t a girl drink. The bartender laughed and thought for a second. She told us that would be a “Caipirinha” which is a Brazilian drink. I and my friend agreed after drinking it that it’s simply an alcoholic lemonade. We liked it but the overall place wasn’t our style. If you are looking for a place to take a date but want to be on the fancy side or you’re a fan of martinis I recommend Touche. If you are not one of these than I would say keep looking.

DSC02229DSC02223DSC02219

Ryoji 

So we are walking and at this point, you have to understand we are pretty drunk. We see Ryoji across the street and decide we should go over. We get inside and see how nice the place is. I mean its very pretty and out of all the places we went to it has the best lighting. As you can probably tell from looking at the pictures. We asked the waiters what they would recommend and they both said different drinks. We said we will get one of each and try it. Now again we were drunk so we forgot to get the names of the drinks written down but we both agreed we liked the drink in the shorter glass more. It had this slightly grassy taste that went down very smooth. The other one was more of a sweet and sour flavor. We didn’t hate it but we wouldn’t order that drink again. Overall great place. We plan to go back there to try the food next time.

DSC02308DSC02259 DSC02269 DSC02275 DSC02294

Smokes Poutinerie

Remember how before when we crossed the street to get to Ryoji. Well, we are even drunker now and we are stupid in general. We had completely forgotten we crossed the street. So we continue down the street and start seeing stores we are sure we passed on the opposite side of the street. Now again let me remind you we are very drunk now and also very stupid. We start to talk about how its such a dumb idea to double up the same store on the same street. We go on about how bad of a business idea that is. on the second store we saw that doubled up I got suspicious. One store on the same street doubling up, ok. Two stores on the same street? No somethings not right here. It wasn’t until we hit the 4th store I realized we are walking backward on the opposite side of the street. We walked for a solid 8 to 10 minutes in the wrong direction before I realized we went the wrong way. We couldn’t stop laughing at how dumb the situation was and then had to speed walk all the way to Smokes. -_-

Now that all that’s^ out of the way. Let’s talk about Smokes Poutinerie. What can I say? It’s the best poutine in the city if you ask me. My friends would agree with that statement. What you see photographed down below is the triple pork poutine. Just writing about it now is making me salivate. I think if I was able to without getting fat I would eat this every day. I mean just look at it. Do I need to say anymore? Do yourself a favor and get some poutine at Smokes Poutinerie. Unless you’re a vegetarian. I mean they do have vegetarian options but meh. It’s just not the same.

DSC02316 DSC02325 DSC02329 DSC02336

Track & Field

I’m going to say right off the bat this place is not my style. Music too loud, drinks were on the more expensive side. The crowd was very young and hipster. I just wasn’t able to feel comfortable there and relax. I felt like I stood out like a sore thumb. That being said. If you are a fan of the whole hipster type stuff than you would like this place. Also if you’re a single guy between 20 and 25 it’s a good place to go since it was filled with girls. Again not my scene but it is someone’s scene. Everyone there seemed to be having a good time. My friend overall didn’t mind it but he really liked the music. The DJ was playing a lot of pretty cool old school music. As a DJ myself I can’t be too impressed about downloading a best of 80s track list and playing it. The good music alone doesn’t validate the place for me. Your results may vary. Oh and we forgot to write the name of the drink we got here as well. It was alright…I wish I can say more but I was pretty drunk by this point and it wasn’t that memorable of a drink, to begin with.

DSC02398DSC02354 DSC02369 DSC02376 DSC02382

The Emmet Ray 

We were so drunk by this point I couldn’t function as a photographer. Hence why I don’t have many good pictures of the Emmet Ray here. I was so drunk I knocked my glass of whiskey over on the table and didn’t want it going to waste so I drank it off the table. >:P Yea I was pretty drunk. My beard smelled like Glenfarclas 12yrs for the rest of the night. That being said the Emmet Ray is one of if not my favorite bar on College Street. The live jazz band always playing quality jazz at the back of the place alone is worth a visit. The whiskey selection is simply amazing. Over 230 different kinds of whiskey. If you are a fan of whiskey this is a place you got to go to.

DSC02482DSC02429

Back to Sneaky Dee’s

After whiskey at the Emmet Ray, we decided we had to go back to Sneaky Dee’s for one last round of Buzz Amber to close off the night. We did just that. All in all, it was a great night. Would do this again for sure.

DSC02452 DSC02463 DSC02469 DSC02476

All shots were taken by me using a Sony a6000 with a 35mm Canon FD vintage lens. Lastly a special thanks to my friend Arash for coming along and helping me drink.

Dream: Blood Ninja

I had a dream last night where I was running away from ninja. I remember hiding in a small crawl space and going through it. It was small but I could crawl comfortably. At some point there was glass on the floor and my hand got pressed into the shards. It was my right hand and it had a few shards stuck in it. I pulled them out, it wasn’t too bad. A little bit of blood or none at all. But there were 2 shards between my pinky finger and ring finger. I pulled the first one out and there was a bit of blood. I then pulled the second one out and blood came shooting out. It was thick almost like honey and it oozed out. I could feel it pulsing out. I could feel my heart pumping and the blood being pushed through my body, I could feel it go through my arm and oozing out the open wound. I crawled out holding my arm up still bleeding. I came out of the hole on the other side and found myself entering a house and washing up in a sink. The water was warm and washed away the blood. I can’t remember if it cleaned up the blood or if it didn’t but it was soothing and for sure helped. I felt my heart not pump as fast or hard. I bandaged the wound to get ready to fight the ninjas who were closing in on me as I woke up.

– The Mad Man

DMA234 – Destiny Planet View Design Analysis

DESTINY DMALink – DestinyPlanetView

Motivation – Social

This sites motivation is social because of the game it is based on. Destiny is an active open world instanced multiplayer game. The game revolves around 3 planets (Earth, Mars, Venus) and the moon. This site lets you explore and see these planets with a Google Maps-style design. The site is made by Google Technologies so it makes sense there are some similarities. I find it being so close to Google Maps as a plus. So many people use Google Maps and this being like it sells the fantasy sci-fi world more. At different points in each world, you will find clickable targets, which give you more information and the option to share across other social media.

Communication Style – Entertainment

Destinyplanetview.com falls under entertainment because none of the planets and its inhabitants is heavily based on actual facts. It is also again based off a video game, which is mainly considered to be for entertainment purposes. The site also takes a cinematic tone. The voice over leading you through the worlds with the combination of the FX’s added more to this fact.

Medium – Web/Interactive

The hierarchy is based off the planets and the moon. Only 3 of these sources are viewable on this site due to Earth not being the one from the game but the Earth we live on now. When you first arrive on the site it actually finds your location through Google Maps and zooms you out into the games universe. The voiceover explains that this is our universe in the distant future. To maintain the realism of this you cannot move around Earth since it would just be Google Maps. The planets are based on proximity, size, and distance.

The scale is fairly large. With the voiceover and all the animations, it can chug on allot of machines and connections that can’t handle it. On some of the school computers, it wasn’t able to maintain a constant frame rate due to this. On a solid connection and decent machine, it should work fine.

I personally found this site to be really cool. As a fan of the game, being able to move through the areas I have been through with my friends in game is nice. The voice over and animations are very well done and the execution is flawless. The game itself will have updates and expansions that will grow out the overall universe. If destinyplanetview.com also grows with these updates and expansions I would find that very impressive and interesting.

DMA133DA – Self Stencil (Skateboard Assignment)

I ended up dropping the whole Charizard skateboard idea because of this whole copyrights infringement thing. Who would have thought its illegal to steal other peoples work? so to keep it safe I decided I’ll just use a self-portrait. Only I own me.

In class, we saw this video about graffiti and these little dot lights things that got really popular with street artists. I was somewhat inspired to have a go at graffiti myself after watching this. I wanted to incorporate a camera into it in some way since the photo video side is what I like the most when it comes to the DMA course. I looked around for photographer, cameraman, camera stencils and couldn’t find anything I liked. So I made my own. Here is a link to the tutorial I used to help me get started.

Tutorial on turning an image into a stencil using photoshop – https://www.youtube.com/watch?v=uFjaMVnGzGA

IMGP2909

I started with taking the self-portrait. Used a tripod and 2 cameras. One camera to hold and 1 camera to take the picture. It took a few tries to get it how I wanted. The camera I’m holding is the Canon T5i with a battery grip and an 18-135 lens. The camera that took the picture is the Pentax Q7 with the 02 Standard Zoom 5-15 lens. The Q7 was set to auto and a 12-second timer.  I also wore black because I didn’t want any extra detail once it got to the final image after editing. This is also my first time doing this and I didn’t want any random situations happening because of what I was wearing.

screen 1

To get that solid black and white look all you need to do is throw your picture on Photoshop and go to (Image – Adjustments – Threshold) You can then tweak the level of intensity after you click into that. You can see that bellow.

screen 2

I had it set to around 116 but if I was going to do it again I would drop it to around 96. I found myself taking out allot I wouldn’t have needed to bother with if I had gone with a lower threshold from the beginning. If I had to give one point of advice that would help you in doing this I would say the more solid and fuzzy the better. That being said again this is my first time doing this so that could be completely wrong. Your results may vary.

self stencil

Here is the finished product. It took me about an hour and a half but if I was to do this again, in general, I think I can get it done in under 45 minutes. One thing to remember is to add bridges that somehow lead out to the white. The reason for this is because you will be cutting out all the black you want the spray paint to be on. If you cut out any black that has white you want in the finished product then you messed up. I don’t know if I did it right here but it looks as close as I can tell. I really won’t know till I start cutting or applying paint. I might just skip the whole graffiti part and mess around with some saturation’s and some images to get the skateboard project done. I’ll see how time and the end result comes out and decide from there. Hope this helped and thanks to marcusthorpe for the tutorial.